Grandma Nell's Spider Web Quilt
A Tutorial by Nkiblueeyes
I'm using lots of pictures and details in this post in case you'd like to make your own spider web quilt. It's a great way to use up scraps from previous projects. Please forgive me for being so detailed, but I wanted to take all of the mystery out of this relatively simple (but complicated looking) block.
Many, many years ago, my Great Grandmother Nell (click here fore more info about her) made this spider web quilt:

I love the scrappy look and would like to make my version in a different color scheme. Thanks so much for helping me with this venture!
We will be using strips of scraps from my stash in the colors of blue, gray, green, purple and black. These will be foundation pieced onto some aqua Essex cotton/linen blend fabric. I chose this because I thought it would be easier to work with than 100% linen. I've pre-washed and dried the Essex to lessen the chance of shrinkage. These quilt blocks will be set on point and the quilt will be assembled by sewing squares together diagonally.
Kits in the Mail
I will be sending each of you kits with way more fabric strips than you'll need in the hopes that you can have lots of choices in which fabrics you think will look best. I'd like for you to return the unused strips with your finished blocks. These will be used to make more blocks and perhaps a quake quilt like Ali made in the next couple of months. Also in the kit will be six pre-marked triangles of aqua Essex cotton/linen blend. These are three 12 1/2 inch squares cut in half. To save time, I marked lines on these triangles to show you where to place strips of fabric for the spider webs.
I am asking that you make me two of the following blocks (although I'm including enough fabric to make three blocks if the spirit moves you.):

I've made several blocks already and thought you might enjoy a preview of what these blocks look like when they're assembled together:

Detailed Directions:
I've already completed steps 1-8 for you.
1. I cut out a 12 1/2 inch square.

2. I lined up my ruler diagonally


4, I created a template to use to trace lines onto the aqua triangles to notate where fabric strips should be placed when sewing. To make this template, I measured and marked a spot 4 inches away from the apex of the triangle on each side. Then I drew a line straight down to the center of the base of the triangle. From the center point, I measured and marked a spot 1/4 inch from the center point on each side. By connecting these four points, I devised a kite shape, which was traced onto a plastic template and cut out.

5. The portion of aqua fabric under the template will be showing on the quilt top. It's the kite portion of the block.

6. I've traced lines around the kite. These lines will not show on the final block. They will be your guide on where to place your fabric strips.

7. I traced both sides.

8. You'll be receiving aqua triangles that look like this:

9. Place a strip of fabric on top of the kite portion of your triangle. You want the fabric to be lined up with the line I've drawn. Step #11 shows the placement of this fabric more clearly.

10. It will look like this before you sew.

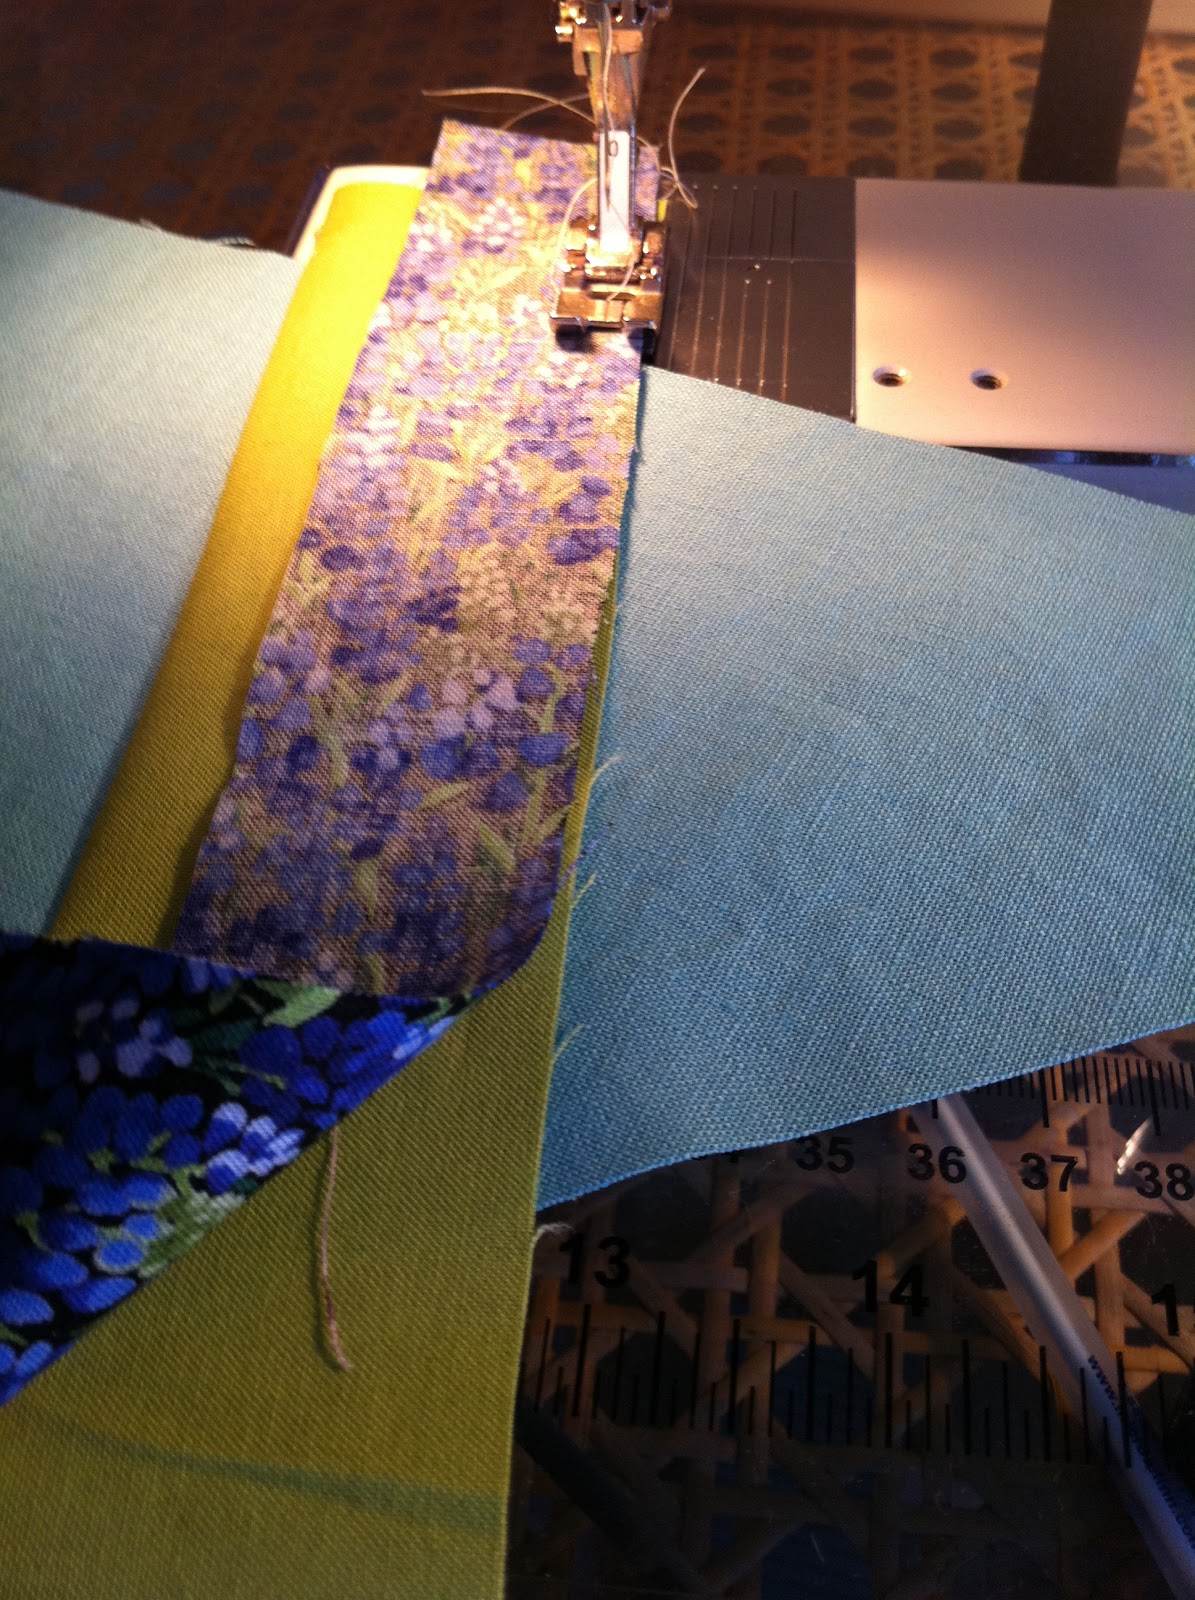
11. Sew your strip down 1/4 inch from the line I've drawn.

12. Here is a close up picture.

13. Continue sewing your strip down 1/4 inch from the line. Then take it off of your machine and press it. *I just finger pressed most of the time and it worked just fine for me.*

14. Finger pressing is fine but an iron gives everything a nice and crisp look as you go. It's up to you.

15. Next, grab another strip, laying it down on top of the first strip. Sew it down with a 1/4 inch seam allowance.
16. Press the second piece down.

17. Add a third strip and sew it down on top of the second.

18. Press.

19. Continue adding strips until you've covered the aqua down past the tip of the triangle.

20. I would love to have lots of variety in colors and widths of fabric.

21. I sometimes found it easier to use a wider strip for the last piece, but I really enjoy the look of smaller strips here, too.

22. At this point, you need to give it a nice press with an iron.

23. This is what your triangle will look like on the back side.

24. Place it on a cutting mat upside down. The upside down part is important, because you'll need to use the aqua triangle as a guide to show you where to trim the strips..

25. Trim off the excess fabric, making the strips flush with the aqua triangle.

26. Repeat on the other side, making all of the strips flush with the aqua.

27. Nice and even!

28. Turn it over. Isn't it beautiful?!? Next, we will work on the other side of this triangle.

29. Place a strip along the other kite line I've drawn for you. Use 1/4 inch seam allowance to sew it down.

30. Press.

31. Sew a second strip to the first.

32. Press.

33. Continue until you've covered the tip of the triangle.

34. The more variety, the better.

35. Press everything down with the iron.

36. Trim all the strips to be flush with the aqua.


37. You've got 1/2 of a block finished. Repeat the above steps with another triangle.


39. I am asking for two completed square blocks. If you'd like to make more for me, I've included enough in your kit to make three square blocks, but please don't feel obligated to make three. These blocks will be assembled on point into a quilt. The blocks will be pieced together in strips on the diagonal.

See how these squares are on point? I'm planning to do put mine on point, too. I like the direction it makes the kites go. More details on this (and how to make setting triangles) in an upcoming revision of this tutorial. I'll update it as soon as I get more blocks back from my bee members.

I'm thinking of embellishing some of these webs with a few little spiders made from pearle cotton. Won't that be fun!?!

This quilt is for my oldest son, Wyatt. He will be turning four in April.

It'll be a man-sized quilt that he can grow into. Thank you so much for helping me create a priceless heirloom for my family.

Excellent tutorial! You make it look super easy, I want to make one too! Hmm, maybe for Bee Vintage...
ReplyDeleteAwesome design! I can't wait to get started with it. I just might have to do this for my month in my Moody blues bee! Thanks for the great tutorial too!
ReplyDeleteCristina
Sure thing! Tammie, I promise it's pretty easy. Lately I'm loving blocks that are trimmed at the very end to make everything nice and uniform. This one fits in that category nicely.
ReplyDeleteAfter I get all the blocks, I'll add to the tutorial on the process of assembling the quilt. I'll have to get some more aqua essex to make setting triangles. I may make more blocks once I see how big it will be with all of the blocks my sweet bee members make for me. I have some time, though.
looks awesome, love your colorscheme. I made one for my 2 yr old, george, and i love watching him sleep under it. I'm sure wyatt will look precious too~
ReplyDelete